Mercury 12 Distance Camera
by TrySight
Last verified June 17, 2026 · classified April 26, 2026
What it is
Summary
AI-generated from vendor-published content · April 26, 2026
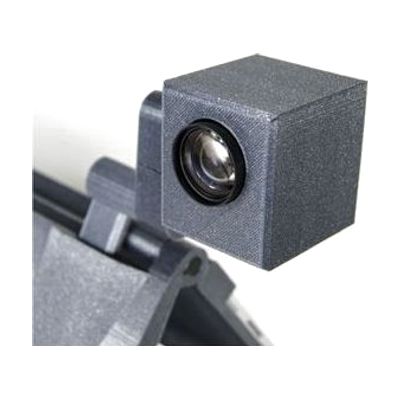
The Mercury 12 is a high-magnification USB camera designed to bring distant content — a whiteboard, projected slides, or a presentation screen — into clear, enlarged view on a laptop or monitor. It uses 10x optical zoom at 1080p resolution, and a three-axis swivel mount lets users aim and lock the camera toward whatever they need to see without constant readjustment. This is not a standalone device — it requires a compatible TrySight system (the Mercury 12 Laptop Tablet Magnifier or Mercury 13 Low Vision Computer System) to display and process the image, and those are sold separately. Worth knowing before purchasing: this camera is purpose-built for TrySight's ecosystem, so it won't simply plug into any CCTV or magnification software and work as expected.
Quick Facts Catalog facts · auto-generated
- AT Act lending
- Medicaid waiver
- Out of pocket
- School district
- Vocational rehab
What Setup Looks Like
- Out of the box
Connect the camera via USB 3.0 to a compatible TrySight Mercury system — the camera is powered through the USB port, no separate power supply needed. - With a guide
- Mount the camera using the swivel joint so it faces the target viewing area (whiteboard, screen, etc.).
- Open the Mercury software and select the distance camera input as the active video source.
- Adjust zoom level and color contrast settings within the Mercury software to suit individual vision needs. Allow 20–30 minutes for initial positioning and calibration. See manufacturer support resources for detailed instructions.
- With professional help
- A low vision specialist or ATP can assess optimal camera placement, zoom settings, and contrast modes for the user's specific visual field and acuity.
- An OT or ATP may also assist with integrating the camera into a classroom or workplace workstation setup for maximum usability.
Getting it
Try Before You Buy
Devices like this are often available to borrow through your state's AT Act program — typically free or low-cost — so you can try it before buying or pursuing funding.
Where to Get It
Some links may be affiliate links — WhatCanHelp may earn a small commission from purchases at no extra cost to you. More on affiliates →
As an Amazon Associate we earn from qualifying purchases.
How to Fund This
Equipment like this is often pursued through official state programs. These are common starting points — each program decides its own eligibility and what it covers, so the first step is always a phone call.
Compare & explore
Sources & fine print
Vendor facts (name, price, platforms, vendor link) sourced from TrySight — view on vendor site; last verified June 17, 2026.
Classification & description AI-generated from vendor-published content on April 26, 2026 · confidence: high. Vendor specs may lag; verify before relying on details in a clinical or funding artifact.